Sunday, November 24, 2013

Black Tie Boogie - My Day!

My day is finally here. This has been such a great Blog Hop and I hope you've enjoyed seeing all the great projects...I know I have! It's hard for me to pick my favorites! Thanks Vickie and Mdm Samm for the time and effort that has gone into this successful Hop and giving me the opportunity to "strut" my stuff!

To begin....I have so many roosters and chickens it's absolutely ridiculous! I have them as figurines, vases, and plates and bowls. They are stuffed, made from sea shells, metal, ceramic, cloth, yarn, glass, wood, and paper. My collection goes from lamp shade toppers to tape dispensers! Some are funny, some are new and some are very old. I recently had to box up...(that is, use several boxes)... a number of them because I was over-run with chickens and roosters.


So....I've added more to my collection for this Hop....go figure! I thought I would make something useful and not just something to sit around waiting for me to dust it. So....I did some pot holders.

This first one was an applique design from EQ7.  It was really easy to do, very few pieces, and I machine appliqued it.


I used the circular attachment for my sewing machine and was able to stitch a perfect circle around the design. I picked one of the decorative stitches from my machine. We should all experiment and use those hundreds of  decorative stitches more. Play around and give it a try! 

For those who read my postings know how much I love to use my Serger. So for the edge I did a serged narrow rolled hem! 


A few more of my roosters welcoming the new addition.


With Thanksgiving knocking at our doors here in the United States, of course I had to do Thanksgiving potholders too!

I like to do machine embroidery so here is a happy Tom Turkey waving at you and wishing you a Happy Thanksgiving!


And a closer view...over 45,000 stitches.


I again used a decorative stitch from my sewing machine to stitch around the design and a narrow rolled hem from my Serger.


 Oops....lets look at Tom Turkey again......


He hung around a little too long!


Thanks for visiting me today during the Hop and hope you continue to have fun visiting  the other participants scheduled for today:


The complete schedule can be found HERE

Have a great week.


Happy Living! Happy Quilting!


Monday, November 18, 2013

Black Tie Boogie Blog Hop Starts Tomorrow

Black Tie Boogie Blog Hop...

November 19th thru November 29th.

(It's all about roosters and hens) 


Thanks to our awesome cheerleader Vickie and the organizational skills of Mdm Samm in bringing this blog hop together. 


Visit the participating bloggers and see what they've created. It's sure to bring lots of fun and inspiration to all! 


November 19
November 20
November 21
                                          Pigtales and Quilts ~ Happy Birthday Thearica !

November 22
November 25
November 26
November 27
November 28


My day is next Monday, November 25th. Come back by and see my creations!

Thanks for visiting!

Happy Living! Happy Quilting!


Sunday, October 27, 2013

My Day - Wicked Blog Hop and a Giveaway

Hope everyone is enjoying the hop and getting lots of marvelously wicked ideas. Thanks goes out to Wendy and Madame Samm for their excellent cheerleading skills and getting this hop together for us to showcase our talents!

Now...What to DO, What to Do!!

I wanted to try a technique that I've not done before and make use of my serger and embroidery machine...the ideas were swirling in my head!  

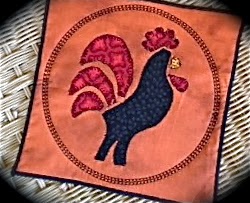
Okay...time to come out of the box and DO applique I said. "Applique? Really?" you say,  "You've never done applique before? And how long have you been quilting?" I know, I know...it's always intimidated me (sigh). I never wanted to take the time to transfer ALL those pieces, iron ALL those pieces, cut out ALL those pieces, then sew ALL those pieces. (sigh, sigh, sigh and sigh). So I picked a fairly easy design from the Happy Harvest book from The Wooden Bear and changed it up a bit to suit my needs. They did a pillow but I decided to do placemats instead.


They were very easy to assemble (only 28 pieces each...each placemat that is).


I did machine applique for the first time and rather enjoyed it...and was rather impressed with myself on how they turned out. Instead of batting I opted for a firm interfacing and ironed it to the backing fabric of the placemat then stitched in the ditch around both sides of the checked border. It seemed enough to hold everything down and not puff up. All they're going to be doing is sitting on the table anyway.


 I debated with myself on how to finish the edges of the placements...binding? That's how we always do it.  I needed to come out of my box more and remembered the Wave Stitch that my serger does. It was a perfect solution and was quick and easy. I chose a loose wave stitch to give it a more primitive look. 


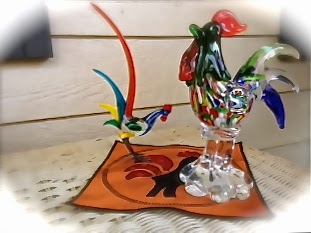
But...I wanted to do more to complete my tables appearance so I dug through my embroidery designs and found some Halloween 3D ornaments to use as a centerpiece.


They were fun and easy to do. Lace is achieved by using water-soluble stabilizer .


The stabilizer is hooped and the design is stitched right onto the stabilizer then cut close to stitching and soaked in water for a few minutes. Wha-la...the stabilizer is gone and you are left with just the embroidered thread design....hence...lace.


Each are stitched out in three-like designs and then slotted together.  I needle and threaded each design together on the top and let them dangle.


The pumpkin was my favorite! 


My next table decoration actually was inspired by my DH. He had seen a pumpkin made with mason jar lids that had been painted orange and arranged in a circular pattern. Well...I thought...I can do that with yo-yo's I'm sure....and I surely did it! I used cinnamon sticks for the stems. Thanks DH!


And of course, we need to have a pumpkin recipe. This is the easiest muffin recipe and...oh so moist. Only two or three ingredients (even better)!


1. Boxed Spice Cake mix, 1 box 
2. Canned pumpkin, 15 oz. (not pie filling)
3. Nuts, seeds, raisins, dates of your choosing if desired

Combine dry cake mix and pumpkin...stir, stir, stir. Batter will be thick. Set aside for about 10 minutes, if desired, to rest batter and let dry mix incorporate into pumpkin, then stir, stir, stir again until well incorporated..batter will still be thick. Stir in nuts, seeds, raisins and/or dates if desired. Spray a muffin pan with spray oil and plop thick batter into muffin tins filling each about two-thirds full. (Don't forget to taste the batter...it's awesome. I was looking for something to spread it on).
Bake in preheated 350 degree oven for 12 - 15 minutes until golden brown. Makes 16 - 18 muffins.

I've also used lemon cake mix and vanilla cake mix but I think the spice cake mix is the best due to the added spices. The moisture is perfect so don't add any liquid. My sister added applesauce one time and water another time and the muffin tops were tacky after cooled. 

Soooo good and Soooo simple!!

Remember to check out today's Wicked Bloggers and see what Wicked things they have done:

Georgia-Girl Quilter (you are here)


And now for the giveaway.....

I am offering to one lucky person this Good Morning Charm Pack from Moda


I bought one for me too and just look at these fabulous prints...and this is just a dabble of what's in the pack!


It will bring some nice cheeriness to the cold dreary winter months ahead or continued sunshine to the coming summer months in the southern hemisphere!

Easy Rules...
1. Leave a nice comment.
2. For a second chance follow me and tell me you are following me in a separate comment.
3. Winners will be picked on Nov 1st by random number generator.
4. I have to be able to reach you by email so please make sure that I can.
5. I will ship internationally...no problem.

Thanks for stopping by and I hope you have a wickedly good time during the rest of the hop!!

Saturday, October 19, 2013

Sewing It - Serger Style and Wicked Blog Hop

Sergers are more versatile than we know.  My serger is an important machine in my sewing studio and I use it for all my sewing projects...even quilting projects. 


Here I've done a serged wave stitch on a project for the Wicked Blog Hop.


See all the excitingly Wicked projects created by those Wicked bloggers October 22nd thru October 31st. Be sure to hop on over to our Wicked cheerleader Wendy at Why Knot Kwilt and peek at the schedule. You're sure to get lots of marvelously creative ideas and have a wonderfully Wicked time! I'm sure giveaways will be offered too...I know I'm offering one!


My day is October 28th so check back and see how Wicked I've been and enter my giveaway.


Tuesday, September 3, 2013

A 16 Year Old Learning to Quilt is a Wonderful Thing...and Other Happenings!

Wow...this year has flown by. Friends kids are back in school and this is the first fall in 19 years that August has not been associated with school for us. Where has this summer gone and what in the world have I done with those days?! Summer brings lots of interruptions for me it seems...especially this year!

First I had left total knee replacement surgery in March...recovery went very well. Then on July 8th I had right total knee replacement surgery...recovery is going well, but slower. It seems I'm about two weeks behind in my recovery compared to my first surgery. My DH has reminded me that I'm not as young as I use to be and I've had two major surgeries within 4 months so it's logical that the second recovery will be a bit slower, plus I'm still rehabbing my first knee....Okay...I will agree with him this time on that subject! But all will be fine in a short while.

I thought I would sew more during my recovery period but that hasn't happened. I stationed my Featherweight and a bag of small UFOs on my kitchen table so that I would not have to manage the stairs to get to my sewing room. Have I sewn? ....Not much. I now know why I have those UFOs...I wasn't happy with the project to begin with and that still holds true it seems....I've not been motivated at all to complete any of the projects. I guess they will remain UFOs for awhile longer.

My daughter started her Appalachian Trail adventure on July 1st. She flew to Maine and is hiking south back to Georgia...2,187 or so miles! She is currently somewhere in Connecticut and having a great time learning a lot about nature and herself. Check out her adventure  on her blog site. She has posted some awesome pictures. I wonder how this adventure will change "my little girl"?

During my recovery for my second knee my mother and 16 year old niece came to help me out. During that time my niece finished her FIRST quilt. She did an excellent job and did the entire quilt herself. Here she is finishing up the piecing. She thought my Featherweight was cute.


Now it was time to quilt and pick a thread color...she chose Fuchsia...and yes she was somewhat nervous about the quilting process.


I gave her a quick quilting lesson and she was off and stitching. She decided on an all over wide stipple and had the quilting completed in a matter of a few hours!


Ahhh...nothing like wrapping up for the first time in a newly finished quilt!


The quilt pattern is Star Power by Tracey Brookshier. It's a great quilt for beginners and it was bought as a kit at Mama's Quilt Shop in Independence, La. 

Thanks for stopping by. Leave a comment...I love reading what you have to say!

Happy Living! Happy Quilting!


Monday, May 27, 2013

Another Finish

My Kaleidoscope quilt has been finished for several weeks now and resides on my bed. I love it and my DH loves it. My Longarm quilting still needs to be perfected, but the only way that's going to happen is by doing. (This is the 3rd quilt I've done on my Longarm). It's hard to see the quilting from the front of the quilt because the Kaleidoscope (K) blocks are so busy. When I arrived at the part of quilting the K blocks I was in quite a dilemma because I didn't want to take away from the K design. So, I just went with it and followed a design pattern from the K block itself, resulting in each block being quilted differently based on the K design of that block. So...I quilted and quilted and quilted for what seemed like forever thinking I would never get to the end of this king sized quilt. 

Well....I didn't know what was happening on the reverse of the quilt...when I unrolled it from the frame this is what I discovered....


My quilt is now reversible. I wasn't even thinking about the back of the quilt! I was totally blown away. Now,  for you expert quilters, this may be nothing to you, but after seeing the reverse of my quilt I was totally impressed with myself!


Every single block is different...just like on the front!

Here is a partial view of the front...on my bed. I used my serger to create a wave stitch for the binding. I totally dislike doing traditional binding and call my methods "Binding without Boundaries" or maybe "No Boundaries for Bindings".


I don't want this post to get too long so I'll do another post later about my experimentation with bindings...especially my serger method. I would love to put together some serger tutorials...there is so much that can be done with the serger in general and combined with quilting. I've even done a mitered border using my serger! Maybe tutorials are in my future (More to come on that too).

Thanks for visiting! Have a blessed day!

Happy Living! Happy Quilting!

Sunday, May 26, 2013

Working in EQ7 and EQStitch

I've not done any quilting or sewing for the past week and a half but I have been intensely exploring my EQ7 and EQStitch programs.

I've had EQ7 for about a year now and have only just piddled with it here and there, only making it through about 4 of the many PDF lessons...then I wanted the new EQStitch program since I love to do embroidery. I couldn't justify buying EQStitch because of my piddling status with EQ7...but I bought it anyway...especially since it was 20% off from the The Electric Quilt Company web site.

Well I dived in...first doing ALL the PDF lessons in EQ7(which took me an entire week of studying the lessons and then exploring the program on my own). What I've found out is that it's a powerful and amazing program that I'm going to need to explore and play with quite often! For my first major project, I'm working on a stacked Flag wall hanging. I got the idea from a painting I saw last weekend when we were out to dinner. (Pics forthcoming in another blog post). But that's what it takes... exploring and practice, exploring and practice and time, time, time to do it.

So after living with EQ7 for a week I dived into the EQStitch program...a powerful and amazing embroidery digitizing program for the beginner or intermediate embroiderer. (EQStitch is a plug-in for EQ7 so you need to have EQ7 to use EQStitch). I completed ALL the PDF lessons plus the lessons from the workbook "Learning EQStitch".  


Here are some of my creations from the PDF lessons and the workbook.


This cat is from the EQ7 Block library that I converted into an embroidery design that can be stitched out.


Here is the same block design that can be used as a machine applique. The text can also be stitched out.


Ah...lovely hearts. These hearts were created using one of the awesome drawing tools...easy peasy! Pick your fill stitch and click in the center of the hearts... pick your outline stitch and click on the outline of the heart...Ta Da...that's it! Then just pick your colors and click, click, then save in your embroidery machine format.


These are some other projects I created. The potted flower and star are applique designs that I actually created from scratch using the drawing tools. The wreathmaker tool is really awesome. I freehand drew a flower, tweaked it with the awesome drawing tools, clicked the wreathmaker tool, set my parameters and wa-la...a design that can be made into a stencil, motif, or appliqued or machine embroidered.

The designs and uses are unlimited!

I also found Beaquilter who has posted several tutorials on EQ7 that have been quite helpful to me.

It has been fun playing around in the program, now I'm ready to create and sew...and experiment more with the program. Wish me luck!

Thanks for stopping by. I love to read your comments!

Happy Living! Happy Quilting!

Thursday, May 23, 2013

What a Busy Month May Has Been!

 It has been such a busy month! 

Not with quilting, but life in general... sorta (I know something to do with quilting is in there somewhere). Our one and only child graduated with Honors from UGA (University of Georgia at Athens) on May 10th. She was one of 5,200 students.  Wow...and I thought her high school graduation was big.  We entertained relatives that weekend and we all had such great family time! I thought I was going to have a hard time with walking and stairs since I'm still recovering from total knee replacement surgery but thank goodness for our handicapped laws. There were ramps, elevators, and escalators throughout the entire stadium....not to mention the handicapped parking. (Thanks to all who came before me that fought for handicapped requirements. It would have been difficult for me to attend if not for these amenities. (Please respect handicapped parking!...okay I'm done with that)).

Before the procession.....

After the procession....

The ceremony was rather long though...2.5 hours with all the speakers, but we were rewarded with a fireworks show at the end. 

I've also been planting some flowers...well, my DH has...All I did was hand him the flowers and supervise.

We planted some Vinca and then my Sunflower seeds started growing also. These I will have to separate.


These little Sunflower plants were more properly placed. It should be pretty with the Vinca surrounding the Sunflowers.


My dwarf Hydrangea is also blooming. I love the blue color!


I'll post before and after pics once the flowers have grown some.
Now it just needs to rain!

Thanks for stopping by. What have you planted this Spring?

Happy Living! Happy Quilting!

Monday, April 29, 2013

Bloglovin or Feedly?

Whoever thought that blogging would have it's own evolution?


I love my Google Reader, but like all things, there is eventually an ending or changing of some sort. And the ending of Google Reader is part of the evolution of blogging...I guess.

Many blogs that's I follow, quilting and non-quilting, are having to make a choice on a different RSS feed if they are wanting to keep up with blogs they follow. Two choices seem to stand out...Bloglovin and Feedly. Currently I am testing both.

Some likes and dislikes I have found:

1. Bloglovin:  They have a button I can place on my blog. I can follow easily and others can follow me just as easily. In order to get your stats you need to claim your blog. Feedly: No follow button is used.

2.  Ease of transferring over the blogs I follow: Both transferred over quickly but Feedly was almost instant. Bloglovin took just a few minutes (I follow over 400 blogs). This has something to do with Feedly using a browser extension (See link to articles below for more information.)

3.  Accessing your reading list:  Bloglovin standard preference sends out a daily email with new blog postings. This can be set to receive emails with each new posting, one email a day, or not receive emails at all.  Feedly requires you to sign in to view any new postings. So far I like to receive the daily email from Bloglovin. It's a good reminder for me to browse blogs that have new postings.

4. Feedly offers more choices on viewing options. The viewing page can be set up to view as a listing, magazine or boards for quick glancing. (I do like this). Bloglovin offers just one style...a listing that can be marked as read. Both offer side menus that can be organized to your liking.

I found this article and this article that did a really good comparison of the two. Whichever your choice, Google Reader is going away July 1st so make your decision quickly so that you will be able to transfer over the blogs you follow. It would be really discouraging to me to know that I had to start my follow list from scratch again. Not to mention all the great quilting projects that I would miss seeing and reading about!

I hope this information has been helpful. Evolution is not an easy thing sometime...but this is pretty easy to do!


Thanks for visiting. I love to read your comments!

Happy Living! Happy Quilting!


Follow on Bloglovin