Thursday, January 16, 2014

T-shirt Quilt - My first

My DD who is now 23 years old had finally released some of her high school and sports t-shirts to me so that I could make a quilt or should I say quilts.  I think she was running out of storage room. This is the first t-shirt quilt I've made (ever) and I probably have enough t-shirts now to make 5 or 6 more bigger quilts for her. After taking this pic and viewing it we've decided to change the top right corner square and use a different t-shirt for that particular square. The square that's there just sort of sticks out to much.  (She didn't know I already sewed the thing together. At least it wasn't the middle square she didn't like.) I plan to do an all-over stipple design in order to make quick work of it.


I need to add borders yet...good thing I've not done that yet since I need to make changes! I'm thinking of doing borders in red since her HS colors were, as you can guess, red and black.
 
After looking more at this pic, I really don't like that top right square either! I'm sure I can find something from the 3 garbage bags that are stuffed with t-shirts!
 
Thanks for visiting!
 
Happy Living! Happy Quilting!

Saturday, January 4, 2014

1st Annual Family Sewing Retreat

I seem to be reverting back to my recent past...and posting really late about happenings in 2013. After this post I promise to move forward into 2014.

I happily regress back to late October, 2013 where we, meaning my 3 sisters and Mother, gathered for our 1st Annual Family Sewing Retreat. This was no small accomplishment since I'm in Georgia, our Mother and one sister is in Louisiana, a sister in Arkansas and one in central Texas. It took quite a bit of planning, emailing, and texting to get our dates set...but we did it and set the date for our Sewing Retreat the last two weeks in October.

Our Mother is conveniently located in Louisiana which was an easy drive from Georgia and a nice stopping point on my way to Texas. After a day's rest in Louisiana my mother, her sewing supplies, me and my sewing supplies drove the 12 hours to my sister's home in central Texas. The first week was spent in Texas and the second week we all drove, in a three car convoy, to Arkansas.  My Arkansas sister who has a blog wrote a fantastic account of our sewing adventure. You can read about our fun-filled family retreat and see pictures of Part 1 - Texas and Part 2 - Arkansas on her blog, Sew Much and More. Meet the family and see how we almost bought a live goat, visited quilt shops and what all we bought and made during our two weeks together.

Here are some of the items I made:

Two pillow cases and a "tater baker" sack.
(The goat in the background was pregnant and delivered, I think twins, two weeks after we left)


A Christmas table topper which I've yet to quilt. It's a Schnibbles pattern by Miss Rosie's Quilt Company called Sunday Best. It was made using 64 Charms and 3/4 yard background fabric. I love the pieced border.


And two little purses. I won these purse kits years ago from A Thread of Red, the blog for my LQS. It's from Lazy Girl Designs and called Runaround Bag.


My sister's horses and donkey enjoyed our photo ops and were always alert to what we might be carrying in our hands and hoping it was a snack for them.
 
We all had a great time laughing, sewing and just being together.
 
 
Now I move forward to December 2013. Here are the Christmas gifts I made for family members. Couldn't post at the time of completion for fear of ruining the surprise.


I machine embroidered dishtowels and potholders for my SILs and MIL. These are 3 of the 6 designs I stitched out.  They're from the Anita Goodesign collection "Baltimore Quilt" and stitched out really well as those designs generally do.


Here are some of the potholders...well these are actually mine. My mistakes in the learning process of adding a backing without removing the project from the hoop in order to keep the design centered. I figured it out and got some potholders for myself too.


The stippling stitched by the embroidery machine shows on the front and back. The center design only shows on the front.
 
 
And I made these pillows for my grand nieces. I included a zipper in the bottom pocket/pillow seam for easy removal of the pillow form so the covering can be washed. 


The sleeping Cat is from Designs by JuJu.
 
 
And lastly for my Mother, sisters and SIL I made these pillows. My father passed away in 2012 and these pillows were made from some of his cotton shirts. I hugged each pillow as I finished them. The pinwheel design went to each sister and my Mother received the other design.
 
 
....and the pillow back made from 108" quilt backing fabric.
 
 
The below frames I stitched out for 2 of my sisters who are converting rooms in their homes into their sewing studios. Yay for them!  You know how we quilters want our own space.


The Sunbonnet Sue design was downloaded from Embroidery Library.


Okay...now I'm done with 2013 and can happily move forward into 2014.  I wonder what it holds?
 
Thanks for visiting me and I love to read all your comments. Have a great weekend!
 
Happy Living! Happy Quilting!


Thursday, January 2, 2014

Goodbye 2013...

.....Hello 2014

I wanted to start the new year with a tidy space, so I spent December 30th and 31st organizing, straightening and rearranging my space which I actually accomplished in those two days!  I truly believe that a tidy space makes for a tidy (and more productive and creative) mind.

 
This old billiards table serves as my cutting station. It's the perfect size and height and I refuse to get rid of it as my DH often times suggest. I store pencils, fabric markers, scissors and rotary cutter in the ball pockets. I just added the white drawers for rules and embroidery stabilizers. Before, the rulers were just stacked on top of each other in a complete mess. This month I plan to make a table skirt for the table to hide the scrap bins I have under the table ledge. Not sure about the fabric yet, but it will be happy.

 
You couldn't even get to this area without having to move ironing board and other stuff. I'm wanting to put shelves up on the wall.  Can't have an empty unused space just hanging around.
 
 
And I put a quilt on the longarm to begin the New Year!
 
How is your space looking?
 
Stay tuned for more posts on Christmas gifts I made. Couldn't post anything for fear of ruining the surprise for the recipients.
 
Happy Quilting! Happy Living!


Sunday, November 24, 2013

Black Tie Boogie - My Day!

My day is finally here. This has been such a great Blog Hop and I hope you've enjoyed seeing all the great projects...I know I have! It's hard for me to pick my favorites! Thanks Vickie and Mdm Samm for the time and effort that has gone into this successful Hop and giving me the opportunity to "strut" my stuff!

To begin....I have so many roosters and chickens it's absolutely ridiculous! I have them as figurines, vases, and plates and bowls. They are stuffed, made from sea shells, metal, ceramic, cloth, yarn, glass, wood, and paper. My collection goes from lamp shade toppers to tape dispensers! Some are funny, some are new and some are very old. I recently had to box up...(that is, use several boxes)... a number of them because I was over-run with chickens and roosters.


So....I've added more to my collection for this Hop....go figure! I thought I would make something useful and not just something to sit around waiting for me to dust it. So....I did some pot holders.

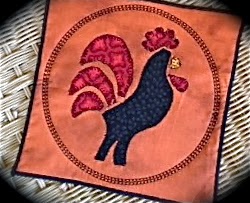
This first one was an applique design from EQ7.  It was really easy to do, very few pieces, and I machine appliqued it.


I used the circular attachment for my sewing machine and was able to stitch a perfect circle around the design. I picked one of the decorative stitches from my machine. We should all experiment and use those hundreds of  decorative stitches more. Play around and give it a try! 

For those who read my postings know how much I love to use my Serger. So for the edge I did a serged narrow rolled hem! 


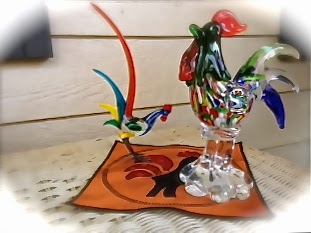
A few more of my roosters welcoming the new addition.


With Thanksgiving knocking at our doors here in the United States, of course I had to do Thanksgiving potholders too!

I like to do machine embroidery so here is a happy Tom Turkey waving at you and wishing you a Happy Thanksgiving!


And a closer view...over 45,000 stitches.


I again used a decorative stitch from my sewing machine to stitch around the design and a narrow rolled hem from my Serger.


 Oops....lets look at Tom Turkey again......


He hung around a little too long!


Thanks for visiting me today during the Hop and hope you continue to have fun visiting  the other participants scheduled for today:


The complete schedule can be found HERE

Have a great week.


Happy Living! Happy Quilting!


Monday, November 18, 2013

Black Tie Boogie Blog Hop Starts Tomorrow

Black Tie Boogie Blog Hop...

November 19th thru November 29th.

(It's all about roosters and hens) 


Thanks to our awesome cheerleader Vickie and the organizational skills of Mdm Samm in bringing this blog hop together. 


Visit the participating bloggers and see what they've created. It's sure to bring lots of fun and inspiration to all! 


November 19
November 20
November 21
                                          Pigtales and Quilts ~ Happy Birthday Thearica !

November 22
November 25
November 26
November 27
November 28


My day is next Monday, November 25th. Come back by and see my creations!

Thanks for visiting!

Happy Living! Happy Quilting!


Sunday, October 27, 2013

My Day - Wicked Blog Hop and a Giveaway

Hope everyone is enjoying the hop and getting lots of marvelously wicked ideas. Thanks goes out to Wendy and Madame Samm for their excellent cheerleading skills and getting this hop together for us to showcase our talents!

Now...What to DO, What to Do!!

I wanted to try a technique that I've not done before and make use of my serger and embroidery machine...the ideas were swirling in my head!  

Okay...time to come out of the box and DO applique I said. "Applique? Really?" you say,  "You've never done applique before? And how long have you been quilting?" I know, I know...it's always intimidated me (sigh). I never wanted to take the time to transfer ALL those pieces, iron ALL those pieces, cut out ALL those pieces, then sew ALL those pieces. (sigh, sigh, sigh and sigh). So I picked a fairly easy design from the Happy Harvest book from The Wooden Bear and changed it up a bit to suit my needs. They did a pillow but I decided to do placemats instead.


They were very easy to assemble (only 28 pieces each...each placemat that is).


I did machine applique for the first time and rather enjoyed it...and was rather impressed with myself on how they turned out. Instead of batting I opted for a firm interfacing and ironed it to the backing fabric of the placemat then stitched in the ditch around both sides of the checked border. It seemed enough to hold everything down and not puff up. All they're going to be doing is sitting on the table anyway.


 I debated with myself on how to finish the edges of the placements...binding? That's how we always do it.  I needed to come out of my box more and remembered the Wave Stitch that my serger does. It was a perfect solution and was quick and easy. I chose a loose wave stitch to give it a more primitive look. 


But...I wanted to do more to complete my tables appearance so I dug through my embroidery designs and found some Halloween 3D ornaments to use as a centerpiece.


They were fun and easy to do. Lace is achieved by using water-soluble stabilizer .


The stabilizer is hooped and the design is stitched right onto the stabilizer then cut close to stitching and soaked in water for a few minutes. Wha-la...the stabilizer is gone and you are left with just the embroidered thread design....hence...lace.


Each are stitched out in three-like designs and then slotted together.  I needle and threaded each design together on the top and let them dangle.


The pumpkin was my favorite! 


My next table decoration actually was inspired by my DH. He had seen a pumpkin made with mason jar lids that had been painted orange and arranged in a circular pattern. Well...I thought...I can do that with yo-yo's I'm sure....and I surely did it! I used cinnamon sticks for the stems. Thanks DH!


And of course, we need to have a pumpkin recipe. This is the easiest muffin recipe and...oh so moist. Only two or three ingredients (even better)!


1. Boxed Spice Cake mix, 1 box 
2. Canned pumpkin, 15 oz. (not pie filling)
3. Nuts, seeds, raisins, dates of your choosing if desired

Combine dry cake mix and pumpkin...stir, stir, stir. Batter will be thick. Set aside for about 10 minutes, if desired, to rest batter and let dry mix incorporate into pumpkin, then stir, stir, stir again until well incorporated..batter will still be thick. Stir in nuts, seeds, raisins and/or dates if desired. Spray a muffin pan with spray oil and plop thick batter into muffin tins filling each about two-thirds full. (Don't forget to taste the batter...it's awesome. I was looking for something to spread it on).
Bake in preheated 350 degree oven for 12 - 15 minutes until golden brown. Makes 16 - 18 muffins.

I've also used lemon cake mix and vanilla cake mix but I think the spice cake mix is the best due to the added spices. The moisture is perfect so don't add any liquid. My sister added applesauce one time and water another time and the muffin tops were tacky after cooled. 

Soooo good and Soooo simple!!

Remember to check out today's Wicked Bloggers and see what Wicked things they have done:

Georgia-Girl Quilter (you are here)


And now for the giveaway.....

I am offering to one lucky person this Good Morning Charm Pack from Moda


I bought one for me too and just look at these fabulous prints...and this is just a dabble of what's in the pack!


It will bring some nice cheeriness to the cold dreary winter months ahead or continued sunshine to the coming summer months in the southern hemisphere!

Easy Rules...
1. Leave a nice comment.
2. For a second chance follow me and tell me you are following me in a separate comment.
3. Winners will be picked on Nov 1st by random number generator.
4. I have to be able to reach you by email so please make sure that I can.
5. I will ship internationally...no problem.

Thanks for stopping by and I hope you have a wickedly good time during the rest of the hop!!

Saturday, October 19, 2013

Sewing It - Serger Style and Wicked Blog Hop

Sergers are more versatile than we know.  My serger is an important machine in my sewing studio and I use it for all my sewing projects...even quilting projects. 


Here I've done a serged wave stitch on a project for the Wicked Blog Hop.


See all the excitingly Wicked projects created by those Wicked bloggers October 22nd thru October 31st. Be sure to hop on over to our Wicked cheerleader Wendy at Why Knot Kwilt and peek at the schedule. You're sure to get lots of marvelously creative ideas and have a wonderfully Wicked time! I'm sure giveaways will be offered too...I know I'm offering one!


My day is October 28th so check back and see how Wicked I've been and enter my giveaway.