Tuesday, February 5, 2013

February UFO projects...and Etouffee recipe


Wow..February is here already and my Birthday is tomorrow! (I feel so wise these days...umm!!!) And Spring is just around the corner...in the northern hemisphere that is!!! (See told you I was wise now)

My UFO project(s) for February are as follows:

1.  Quilt my January FO for Shop Hop display in March. I bought a brand new Baby Lock Crown Jewel Long Arm in September and I've been practicing...some...it's so intimidating!! I mostly just look at it and talk to it, but now it's time to show it who's boss!! My sister over at Sew Much & More gave me some wonderful rulers/templates for Christmas and I've been practicing with those...they are great!

AND...

2.  I was rummaging through a bin looking for more black and white scraps for my January project and I found some Kaleidoscope blocks that I started about 2, maybe 3 or 4 or 5 years ago...you know what I mean. And...Oh My Goodness...how could I have forgotten about these blocks and how amazing they look!!! I may need to make one or two more depending on the layout...NOT...I have 59...yes...59 of these blocks...WHY?!! Don't know what I was intending to make in that other quilting life...two quilts maybe?!  They are 10 inch blocks...that is a lot of square inch-age! Just this morning when I was making my bed I was thinking about a new quilt for the bed...I think I've found it. I should have enough to even make pillows. So really all I have to do for this February UFO challenge is to add sashing and just sew the blocks together...easy peasy...right? Right! (Well, then sandwich it and quilt it, but I don't count that in current month's finish).

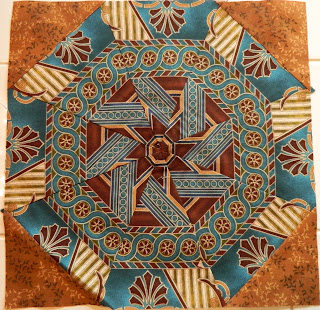
Here is a small sampling of the 59 blocks. Don't look too closely though as this was my first attempt at Kaleidoscopes...or what some call the horrid name of Stack and Whack (I dislike that name tremendously). All Kaleidoscopes are beautiful and unique no matter the fabric and should have a more elegant name...Stack and Whack...come on...really? Okay...here they are....


Aren't they so unique. If I remember correctly, all the blocks came from 8 single repeat design yardage, laid (stacked) on top of each other with design matched up then cut (whacked) using a certain degree ruler. I will need to re-fresh my memory on how these blocks are made! I love all 59 of them and think they will make a beautiful quilt. I find it amazing that all 59 came from the same single fabric design. Need to start thinking of sashing color though..green, brown, steal blue...umm.

When rummaging through that bin I also found  5 of these...I guess they are potholders. They are not that pretty but I really could use them...


And now for the recipe of the day:

Another Southern Louisiana dish. The name sounds like it would be a lot of work, but it's a simple dish.

Crawfish (Shrimp) Etouffee

é·touf·fée

noun, plural é·touf·fées
New Orleans Cookery. a stew of crayfish, vegetables, and seasonings, served over white rice.
Origin: 
 < Louisiana French; French (à l')étouffée  cooked in a closed vessel with little liquid, braised; literally, to smother, suffocate.


Ingredients:

1/4 pound of butter
2 large onions, chopped
2 stalks celery, chopped
2 cloves garlic, minced
1 medium bell pepper, chopped
Salt, red and black pepper to taste
Tabasco sauce to taste
1 - 2 pounds crawfish tails or deveined shrimp
4 tablespoons flour
2 cups water
4 chicken bouillon cubes
Green onion tops to taste (optional)
Parsley to taste (optional)
Cooked rice

Melt butter in heavy skillet; saute onions, celery, garlic and bell pepper in butter over low heat until tender. Season to taste. Add crawfish or shrimp. Saute 1 minute; add flour. Continue cooking about 3 more minutes. Add water, bouillon cubes, green onions and parsley; Simmer for 10 -15 minutes. Serve over cooked rice. Serves 4 - 6.

Thanks for stopping by and visiting. I love to read your comments so please leave one! 

Hope you enjoy the Etouffee and have a grand day!

Happy Living! Happy Quilting!


Friday, February 1, 2013

January UFO - Finished (piecing)...and King Cake Recipe

It's A Saturday Sharing Day at Pigtales and Quilts. Go take a look at what everyone else is sharing on this Saturday and share something yourself. It's easy to link up! This is what I would like to share...

...I am so happy to report that I finished piecing my January UFO (quilting to happen this month). I think this quilt came out fantastic and is more stunning than what I expected. I love the blacks and whites! Quilt book and pattern information can be found here on a previous post. String quilts can use up so much thread. I bet I changed my bobbin at least 12 times! No matter I still love it. 

I was in a dilemma about the borders. I didn't want anything too fancy that might take away from the quilt, but didn't want just black borders either. I had thought about extending the side half diamonds into the border but that was going to take making 44 MORE squares and I was already wanting this quilt to end. Julie over at Julie's Quilts and Costumes  commented about the same idea of extending the diamonds and it made me thank about it again. Thank your Julie, your comment moved me in the right direction.


So I cut out 44 more stabilizer squares, 44 more black center pieces (which I had to re-design since I only wanted half a diamond and border section). I rummaged through my stash and found more black and white fabric and hoped the 7 inches of sparkly white fabric I had remaining for the outside of diamond was going to be enough. So I made these which is one fourth of a diamond and what I hoped would be a black border. Well, I made one at first....


Then two...and laid them out....then remembered I had to do mirror images when I sewed them together. (Glad I thought of that before I started sewing..whew). Happy with these two and what I hoped to accomplish in my mind, I sewed on...and on...and on. When I had all 44 completed I had a 1 inch strip left of my sparkly white fabric and was digging through the garbage can for black and white scraps I had discarded. But I had enough to finish!!!


Ta-da....

here is my finished quilt top! I was very pleased with the way the half diamond and black fabric created my border and surrounded the quilt. 


I plan on bringing it to Show and Tell this morning at my LQS for our monthly "Strip Club" get together. 

I'm glad this project is pieced. Now I need to go shopping for more black and white fabric! Aw...the tragedies of quilting!

Now...on to other things.

Since it is Mardi Gras season I thought a King Cake recipe would be appropriate. Mardi Gras is one thing I do miss about living in Louisiana. It's such a fun and happy time!

My niece, Angela, sent me this recipe named

As Close As You Will Get To A Louisiana King Cake Outside of Louisiana King Cake Recipe

or I'll just call 

 Mardi Gras King Cake Recipe


Ingredients: (makes two cakes)
Pastry:
1 cup milk
1/4 cup butter
2 (.25 ounce) packages active dry yeast
2/3 cup warm water (110 degrees F)
1/2 cup white sugar
2 eggs
1 1/2 teaspoons salt
1/2 teaspoon nutmeg
5 1/2 cups All Purpose flour

Filling:
1 cup packed brown sugar
1 tablespoon ground cinnamon
2/3 cup chopped pecans
1/2 cup All Purpose flour
1/2 cup raisins
1/2 cup melted butter

Frosting:
1 cup confectioner's sugar
1 tablespoon water
Green, yellow, purple food coloring

Directions:
Scald milk and remove from heat. Stir in 1/4 cup butter. Allow mixture to cool to room temperature. In a large bowl dissolve yeast in the warm water with 1 tablespoon of the white sugar. Let stand until creamy, about 10 minutes.

When yeast mixture is bubbling, add the cooled milk mixture, whisk in the eggs, stir in remaining white sugar, salt, and nutmeg. Beat the flour into the milk/egg mixture 1 cup at a time. When the dough has pulled together, turn it out onto a lightly floured surface and kneed until smooth and elastic, about 8 - 10 minutes.

Lightly oil a large bowl and place the dough in the bowl turning to coat dough with oil. Cover with a damp cloth or plastic wrap and let rise in a warm place until doubled in size, about 2 hours. Punch down and divide dough in half.

Preheat oven to 375 degrees F. Grease 2 cookie sheets or line with parchment paper.

Filling: 
Combine brown sugar, ground cinnamon, chopped pecans, 1/2 cup flour and 1/2 cup raisins. Pour 1/2 cup melted butter over the cinnamon mixture and mix until crumbly.

(Cream cheese and/or fruit pie filling with the pecans, cinnamon and brown sugar also makes an excellent filling and is very popular in the New Orleans area)

Putting it all together:
Roll dough halves out into large rectangles approximately 10 x 16 inches. Sprinkle (or smear in the case of cream cheese) filling evenly over the dough and roll up each half tightly like a jelly roll, beginning at the wide side. Bring the ends of each roll together to form 2 oval shaped rings. Place each ring on a the prepared cookie sheet. With scissors make cuts 1/3 of the way through the rings at 1 inch intervals. Let rise in a warm place until doubled in size, about 45 minutes.

Bake in preheated oven for 30 minutes. Frost while warm with the confectioner's sugar blended with 1 to 2 tablespoons of water and food dye. Also can be sprinkled with colored sugar if desired.

Enjoy!

If you want to know more about the history of the King Cake, click here to read this short article.

Thanks for stopping by and I love to read your comments!

Happy Living! Happy Quilting!


Monday, January 28, 2013

January UFO...almost done!...and a New Orleans Beignet recipe.

One of my January 2013 UFO projects I started last April or May was to complete my black and white Star/Diamond quilt. I'm lovin the way it has turned out!!! It's from the book String Quilt Revival and is named "Diamonds are Forever".  I love the book...the quilt design changes based on the size, shape and placement of the one constant fabric (my black fabric).  Instead of muslin or some other fabric, the authors use stabilizer as the foundation piece. It is a refreshing twist on the normal string quilt that I've tackled in the past. I love the simplicity of just using the two colors!


Here is a closer look. The quilt is made of 30 large blocks and measures about 60 x 86. The black and white strips seem to make the diamonds just sparkle!! I used some white sparkly fabric as my second constant fabric that I placed as the first string next to each black piece (That gives it a REAL sparkle).


This is a pic of the quilt in the book to get an idea of the color variation! In my opinion both are well worth doing!! When I first saw this quilt though, I knew I wanted to do it in black and white. I always say...go with your first instinct...I'm glad I did.


I need a border...not sure what I'm going to do. Any suggestions? Embroidered border in diamonds? Simple black border with diamond quilting? Maybe a white binding? I figure it needs to be simple so not to take away from the beauty of the quilt. I will let you know what I come up with.

On to other things...

Food brings people together. Food is our common ground, a universal experience. It's a language everyone understands and makes friends among all people while it warms the heart.

Today's Recipe is...

Another New Orleans Tradition

Beignets


bei·gnet


ben-yey 
noun, plural bei·gnets  [ben-yeyzFrench be-nye]


a fritter or doughnut.
The French-Creole colonists who came to New Orleans in the 18th century introduced the Beignet. The concept of the dessert is simple - dough is fried then covered with powdered sugar. Beignets are made from square-cut pieces of yeast dough and do not have a hole in them. Serve hot with cafe' au lait or chocolate milk.
Ingredients: 
1 cup scalded milk
1 egg, beaten
2 tablespoons vegetable oil
2 tablespoons granulated sugar
1 envelope dry yeast
3 cups all-purpose flour
1 teaspoon salt
1/2 teaspoon ground cinnamon
1/2 teaspoon ground nutmeg
Vegetable oil for deep frying
Powdered sugar

In a large bowl, combine the milk and egg with the 2 tablespoons vegetable oil and the sugar. Blend thoroughly, then add the dry yeast and stir to dissolve. Sift together the flour, salt, and spices, then add half to the yeast mixture. Mix well. Add the remaining flour and knead to incorporate it. Form a large ball, cover, and let double in size, about 40 minutes. Punch down and knead until dough is elastic.

On floured surface, roll out the dough to a thickness of 1/4 inch and cut into 24 5-inch squares. Cover and allow to rise again, for about 45 minutes.

Pour 3 inches of oil into a deep-fryer or tall, heavy-bottomed saucepan and heat to 375 degrees F. Drop in the dough squares a few at a time, cooking and turning them until golden. Remove with a slotted spoon and drain on paper towel. Dust with powdered sugar. Serve hot, 3 to a serving. Serves 8.

The Food of New Orleans, 1998; Periplus Editions, Boston, MA

Hope that you enjoy. Great as an evening snack too!!!


Thanks for stopping by and visiting! Hope your Monday was a pleasant one and your Tuesday will be great!

Happy Quilting!  Happy Living!

Saturday, January 26, 2013

Muffuletta or Muffaletta? A New Orleans Tradition.

It's A Saturday Sharing Day at Pigtales and Quilts. Go take a look at what everyone else is sharing on this Saturday....This is what I would like to share...


muf·fu·let·ta

 [muhf-uh-let-uh] 
noun
a thick, round sandwich similar to a herotypically containing ham, salami, and cheeses and topped with an olive salad, a specialty of New Orleans.

I didn't get any sewing done today, but I did make one of these sandwiches that my husband loves and could enjoy on a weekly basis. My local grocery store use to carry a similar semolina type bread but then stopped. So...if I wanted to make this sandwich I had to learn to make my own bread too! I succeeded. I use my bread machine to mix the dough and use for first rising. There are two more rising to go before baking. 

The muffuletta sandwich is one of New Orleans' signature foods. The sandwich originated at the city's Central Grocery early in the 20th Century, when Italian-born farmers brought their produce to the local farmer's market. The Italian-owned grocery stocked their favorite meats and olives and, over time, the owners hit on the idea of making lunch easier for the farmers by creating a sandwich that would hold all their favorite ingredients. The loaf used was a round, Sicilian bread called muffuletta, which gave its name to the sandwich.

Read more: What Is Muffuletta Bread? | eHow.com http://www.ehow.com/info_8423893_muffuletta-bread.html#ixzz2J7oIHDzh

Steps to Build a Great Muffuletta 

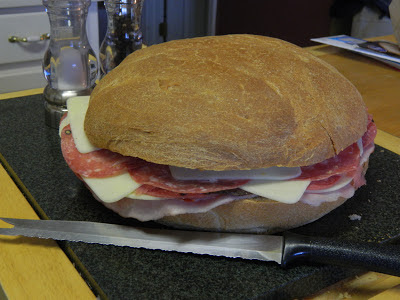
Here is my round 1.5 pound loaf. This will be one sandwich cut into wedges. It smelled soooo good while it was baking. I love baking breads in the Winter. (Small round sandwich buns from grocery bakery will work well too..not hamburger buns, they are too soft.)


I use Olive Salad from Gambino's Bakery in New Orleans. Any time I go back home for a visit, this is one of the items I always bring back. (If I'm out I just make my own. The one I make is similar to this one)


I drain the olive salad in a colindar and generously spread it onto the sliced loaf. I will use a little more than half the jar. Don't discard the drained olive oil!! It's great for dipping fresh breads into or to dribble over steamed veggies. I just pour the oil back into the jar until I need it.


Onto the olive salad I next put a layer of Honey Ham then a layer of Hot Capicola.


I then add a layer of Provolone cheese....


Then a layer of Hard Salami....


Then a layer of Pastrami....


Then a layer of Mozzarella...whew...wait there's more....


Then a layer of Sopressata...


I generally have some extra slices of Mozzarella left, so what the heck...I throw those on to...
Just a few more steps left.


A little more Olive Salad on top...and...


Put the top half of the bread on...and...


Slice into eight wedges...and...


Plate it up, zap individual wedges in microwave for about 30 - 45 seconds to melt cheese...and ENJOY!


Serves 6 - 8 people. I can only handle one wedge and sorta have to eat it sideways....DELISH!!

It was nice spending a cold Saturday baking bread and sipping coffee then enjoying this sandwich for supper.

Hope you try it and enjoy it. Let me know if you do. 

I buy about 1/2 pound of each ingredient but usually don't use it all. (I normally have other uses in mind for the remainder or make two and wrap wedges in plastic wrap and keep in frig for a quick grab)

Thanks for visiting! I love reading your comments!

Happy Living! Happy Quilting! Happy Cooking, too!


Friday, January 11, 2013

Happy Friday! I Need Some Sew Therapy!

Wow...it's already January 11th...almost half the month gone. For me, beginning January 1st., a nasty stomach virus reared it's ugly head and stayed with me until Jan 8th...I lost 13 pounds! Last Sunday the nasty bug decided to infect my DH and he is still having symptoms. He lost 12 pounds after 4 days!. Boy...that's not how we wanted to start this year. I didn't even make losing weight a New Year's Resolution and that's the most weight I've lost even when making that a resolution...go figure! I'm finally feeling like my old self and wanting to sew. Like most of you, after I've read some blogs, this year seems to be the year for completions...and I'm following suit. I have so much money invested in fabric and half  or one-fourth completed projects that I've decided it's time to finish some of my projects. 

Below is my January "Try-To-Finish" project. I believe I started it last Spring. It's a string quilt and very forgiving since my seams are not meant to match up...well except probably the center of star section...It's great to sew up while watching TV since there is very little thought that has to go into it. I decided to do mine in black and white fabric with the center black as my constant focus fabric. This is eight squares or 2 blocks...I have 112 more squares to make or 28 more blocks to make by the end of January. Put another way... 5.6 squares a day or 1.4 complete blocks a day. No problem! Hope it will put a dent into my black and white stash! Oh..I also decided to use some sparkly white fabric as my second constant fabric that is attached to each side of the center black fabric. 


The design came from String Quilt Revival. I love this book. All the designs in this book have one constant fabric and based on the shape of that piece and where it is placed on the square determines the look of the finished quilt block. It's a nice take on the standard string quilt. Also the authors use embroidery/fabric stabilizer instead of a muslin or other fabric as their base to sew on. I find this gives the block a less bulkier feel.


This is the finished quilt in the book "Diamonds are Forever". It's very striking...but I'm glad I selected to use up some of my black and white fabric. I think it will be just as striking!

 My sister at Sew Much and More, a quilty friend Pam, and I decided to start another blog so that we would have a mutual place to post our progress and finishes of our 2013 projects. Visit and follow us at Friends Who Quilt to check on our progress. We hope that by listing and posting our projects would make us more accountable and committed to finishing. Wish us luck!

Thanks so much for visiting. I love to read your comments!

Happy Quilting! Happy Living!